

So, you want to share your passion with the world and partner with an awesome sidekick to help you spread the word? Cool! We’re in.
Here is a clear step-by-step guide to help you create an optimized, compelling Listing from start to finish.
The goal is a Listing that gets discovered and inspires action!
It boils down to just 3 things:
✅ Do you provide value?
✅ Do you tell a compelling story about this value?
✅ Do you consistently deliver this value to your customers?
If this is you 👇 Then you’ve graduated to the next step!
STEP 1: BECOME A PARTNER
To begin, you must first apply to become an EXPLORINGNOTBORING Partner.
Once you fill out the Partner Form with a few basic details about yourself, you’ll then be guided to submit your first Listing for acceptance into this niche marketplace.
In order to be approved, you must meet our Quality Standards. Our approval team will review your Listing against these standards and we’ll also look for opportunities to improve your customer experience and optimize your Listing to sell more online.
Before applying to become a Partner, please review our Terms, Policies, Community Standards, and Partner Terms. It’s all basic stuff, really, put in place to help us build a thriving community by upholding our Quality Standards, Values, and Mission.
STEP 2: SELECT YOUR LISTING TYPE
exploringnotboring.com is a boutique of unique activities, events & products!
Learn more about the types of original ideas we promote in our farmers-market-style online store ℹ️
After you complete the Partner Form, you’ll be directed to share your original idea with us by choosing the Listing Type that best fits your offer: Activity, Event, or Product.
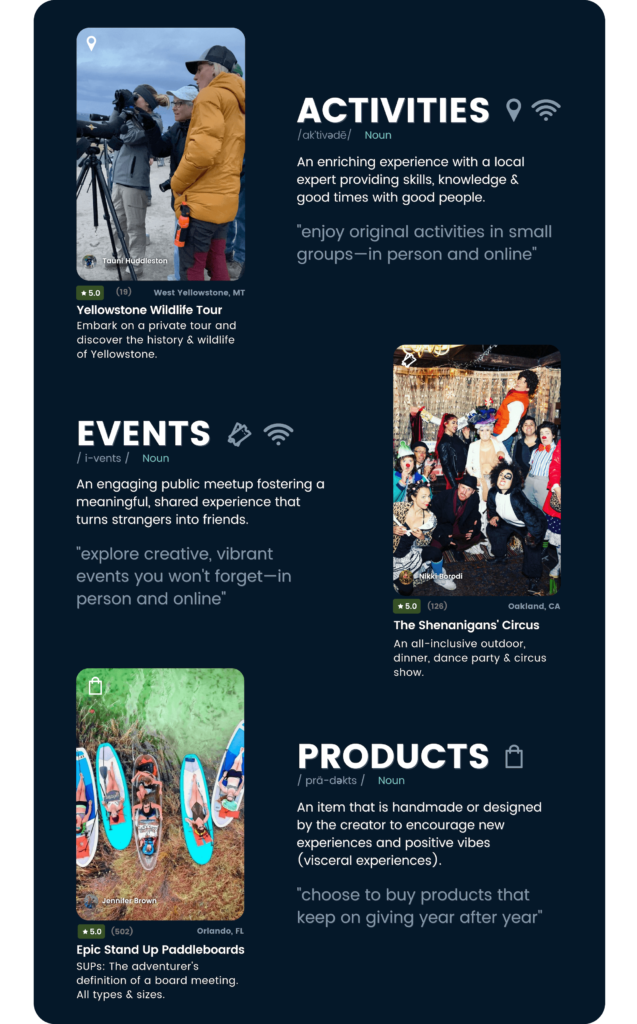
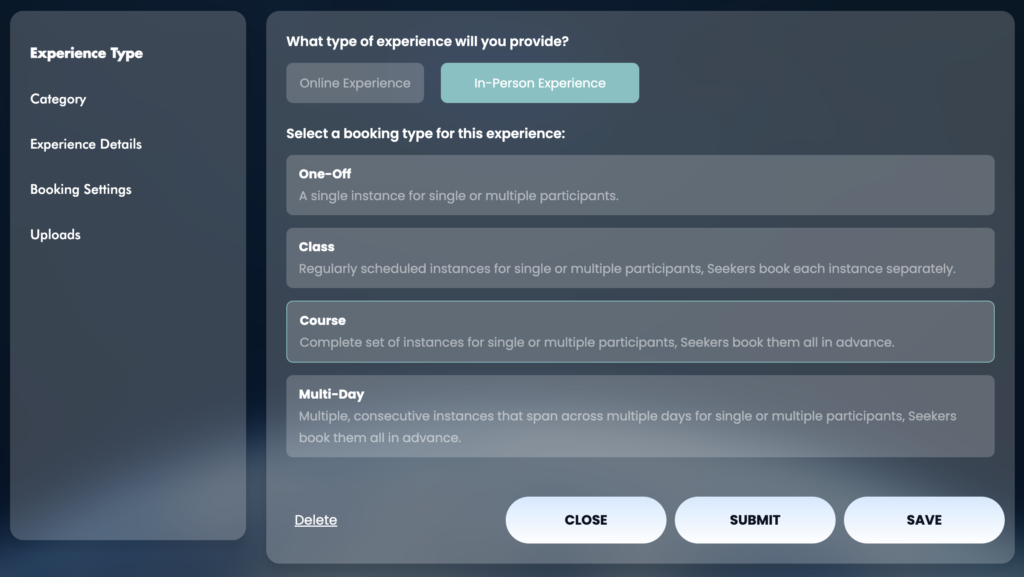
STEP 3: SELECT ACTIVITY, EVENT, OR PRODUCT TYPE
- What type of Activity, Event, or Product do you provide?
- Select a booking type for this Experience
For Product Listings, you’ll need to define which type of product you provide.
On exploringnotboring.com, we support products that encourage experiences & connections. These types of products can be handmade goods, experience gear, or both. Select the type that best describes your product:
- Handmade Goods: Items made and/or designed by you, the seller.
- Experience Gear: Any tool, accessory, or item that expands or elevates a Seeker’s experiences (e.g. hammock, garden book, roller skates, craft supplies, yoga mat).
For Activity and Event Listings, you’ll need to define which type of experience you provide by selecting either in-person or online.
You’ll then select your Booking Type, which controls the Advanced Ticketing options and Booking Settings you’ll see + how Seekers book your experience.
AN IMPORTANT DEFINITION TO KNOW: “INSTANCE”
An Instance of your Experience is a bookable date & time. Therefore, every time slot available for booking is a separate Instance of your Experience.
Once your Listing is approved, you can add the dates & times you want to offer for your Experience on exploringnotboring.com (an “Instance”).
By making an Instance of your Experience available to book on exploringnotboring.com, you agree that the amount of tickets, seats or spots booked will be reserved for Seekers to attend the booking.
You further agree to follow our guidelines for quality Experiences.
Booking Types
- One-Off Activity: A single Experience that is not part of a sequence. One or more Seekers can book a single instance of your Experience, or if offered, Seekers can book multiple instances in advance to repeat the Experience (typically at a discounted rate) at a frequency of their choosing (a great option for Wellness Experiences or casual classes).
Examples Include: Goat Yoga Class, Art & Food Tour, Breathwork Session, Anime Drawing Class, City Tour by Bike, Shopping Hunt, Sunset Surfing, Cooking Class, 1-on-1 Sewing Class, Historic Ghost Tour, and more
- Course: A sequential Experience with a complete set of classes that occur at a set frequency. One or more Seekers book the whole set of classes in advance. A single booking will be created for the whole set of classes.
Examples Include: Drum Lessons, Body Language Course, Spanish Classes, Aerial Arts Lessons, Drawing Course, or How to Upcycle Your Clothes Series
- Multi-Day: An Experience that spans across consecutive days. One or more Seekers book all instances in advance. A single booking will be created for all days booked.
Examples Include: Backpacking Excursion, Camping Trip, or Adventure Tour
- One-Off Event: A single Event that is not part of a sequence. Multiple Seekers can book a single instance of your Event on the fixed date and time offered.
Examples Include: Paint Night, Virtual Magic Show, 5K Obstacle Course Run, Outdoor Movie Screening, or Circus Dinner Theater Experience
- Reoccurring: An Event that occurs periodically, repeatedly, or across multiple days. Multiple Seekers can book a single instance of your Event, or if offered, Seekers can book multiple instances in advance to repeat the Event (typically at a discounted rate) at the frequency offered (great for multi-day events).
Examples Include: Local Concert Series, Open Mic Mondays, Annual Culture Festival, Community Drum Circle, or Poetry Reading Series
STEP 4: SELECT YOUR CATEGORY & KEYWORD TAGS
- What category does your offering mainly fall under?
- Add applicable keyword tags
What category does your experience mainly fall under?
Activity, Event, and Product Listings must choose the category that best applies to the offer. We support super unique, original ideas, so if you need to select a second or third category to accurately depict your offering, you can.
Just keep in mind that we prioritize categories for search in order of selection: primary > secondary > tertiary
Meaning, your first selection is your primary category, your second selection is your secondary category, and your third selection is your tertiary category.
This means, for example, Listings with your tertiary category as their primary or secondary category will show above your Listing in search results.
Word to the wise, a category must represent a key component of our offering.
For instance, serving a complimentary cup of coffee doesn’t make it a coffee experience, right? No, but learning how to roast coffee beans and then use the pigment to create an abstract painting would warrant selecting two categories:
[ Drink > Coffee ] + [Art & Design > Art]
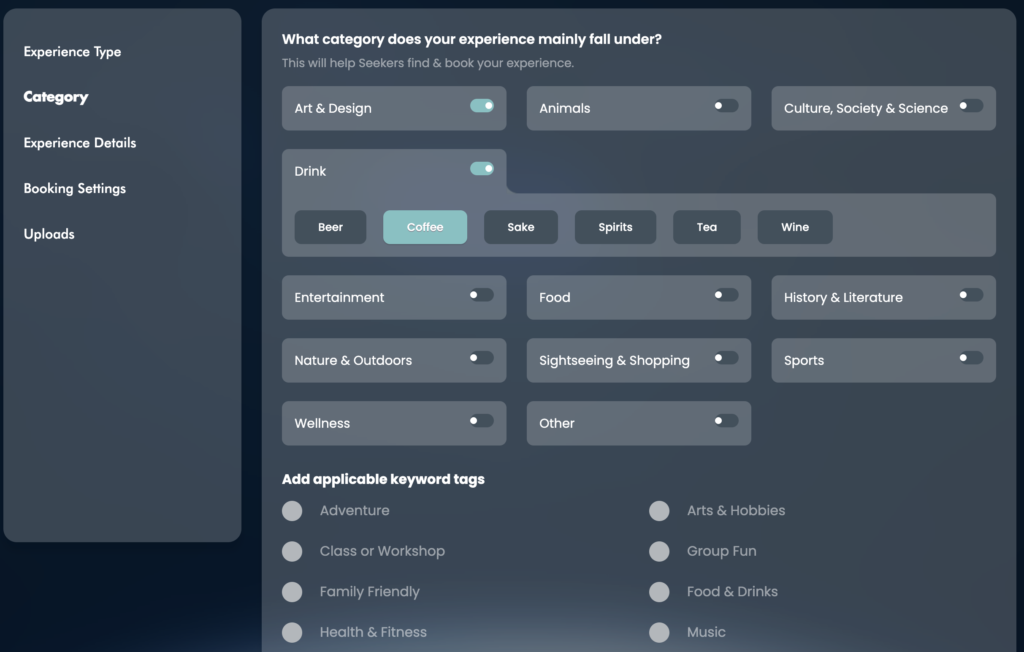
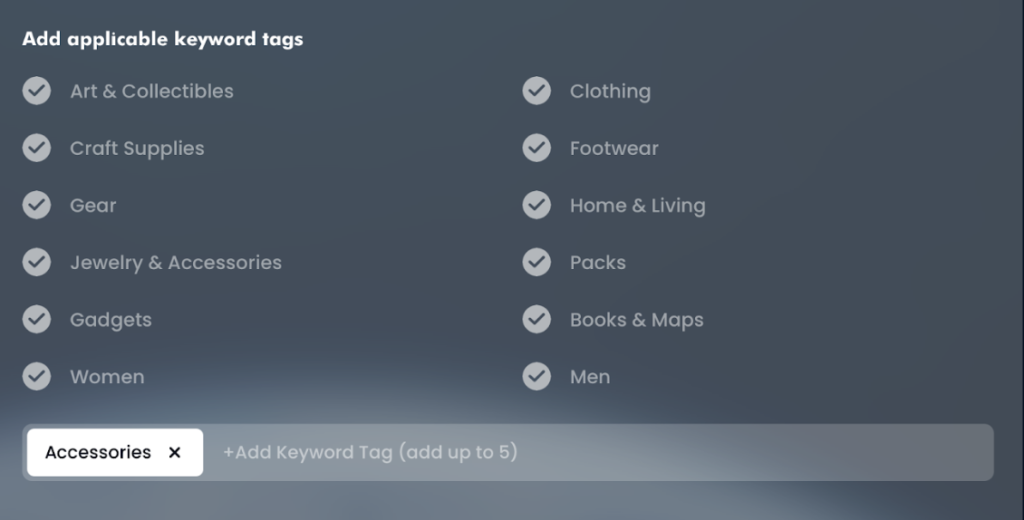
Add applicable keyword tags
Don’t forget to add your keyword tags!
Tags help your Listing get discovered by applying relevant search terms that accurately describe your offering.
You can apply up to 5 keywords.
These should be targeted, relevant, words or phrases that people would actually type into the search to find your exact Activity, Event, or Product.
For example, if you offer unique food tours through the neighborhoods of Orlando, Florida (*cough* *cough* Tracy’s Wandering Palm Food Tours), then you might apply the following keywords using language people would actually use to search for something like what you have to offer:
- food tours
- Orlando food spots
- wine tasting
- foodie tours
- food lovers
STEP 5: ENTER YOUR DETAILS
This is the part where you add all the golden nuggets about your offering:
- Title
- Description
- Rules
- Price
- Photos & videos
Remember, for Activity & Event Listings, you’ll have the opportunity to add your Booking Settings after your Listing is approved.
ACTIVITY/EVENT/PRODUCT—What is the title of your offering?
Your title is the first thing Seekers learn about your offer, so keep it scannable (aka keep it short, 40 characters max), descriptive, exciting, and compelling!
To help your Listing get discovered, ensure your most important keyword is present in your title (it should also have been added as a keyword tag already, and you’ll include it in your description next as well).
To write an exciting and compelling title, think about the greatest benefit your Activity, Event or Product has to offer.
What makes it unique? What makes it desirable?
ACTIVITY/EVENT/PRODUCT—Add Your Description 🤯
Your description should be fun, interesting, exciting and compelling!
Don’t skimp on the important details like your agenda or itinerary, specs & benefits, and highlighting the uniqueness of what you have to offer.
Seekers want to know exactly what to expect and why to buy from YOU!
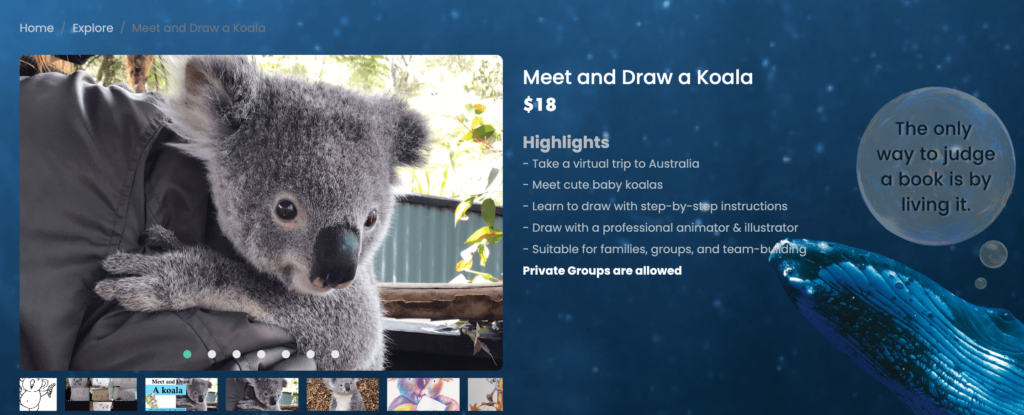
ACTIVITY/EVENT/PRODUCT—What are the highlights?
The highlights section is your chance to emphasize the key details Seekers want to know. Since your highlights are at the top of your Listing page, right under your title & price, this is prime real estate to provide scannable details highlighting your value proposition right up front.
EXAMPLES OF HIGHLIGHTS
- Laugh while you learn origami
- Connect with other stargazers
- Walk the mesmerizing historical center
- Learn from a Hollywood animator
- Made from 100% Recycled Chipboard
- Improve sleep, energy & perform better
- Handmade Venezuelan Clay Mug
- Gain hands-on experience with beekeeping
- Learn riding techniques for a variety of terrain
- Food & Drinks Included
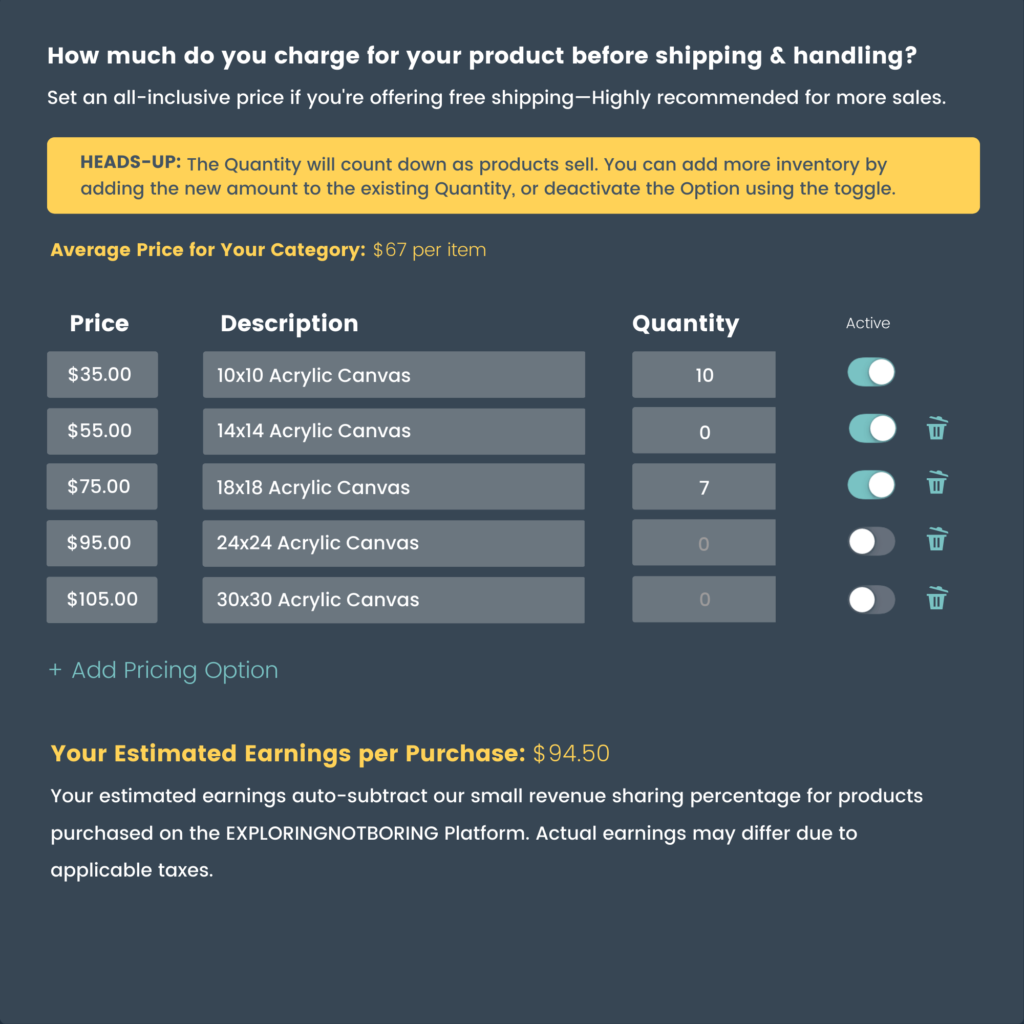
ACTIVITY/EVENT/PRODUCT—What’s your inventory?
In this section, you’re defining your total quantity available.
In other words, how many tickets, seats, or spots are available to book per instance (date & time)? Or how many products do you have for sell?
Think about whether your Activity is best suited for a 1-on-1, an intimate group, or a large group. For Events, think about the capacity of your venue and take that limit into consideration when setting your quantity. Since events are public gatherings, you may have additional attendees show up on top of the number of bookings you receive through exploringnotboring.com
For Products, your quantity should reflect an accurate inventory count.
ACTIVITY/EVENT—Who can attend this experience?
From babies to centennials, we all need to know whether or not your Experience is a good fit for us in order make an educated decision to buy or not to buy (that is the question 🤓).
This is the place to define any requirements that must be met in order to participate in your offering. For instance, if all attendees must meet strict requirements around age, skill level, or certifications, let them know here.
EXAMPLES:
- 21+ required
- “Anyone who can follow the instructions by himself/herself or with support of other adults”
If nothing special is required, this is a perfect place to mention who this Experience is well-suited for:
“Our clear kayaks are perfect for families, couples, small and large groups.”

It’s a grrrrreat thing when people buy more than 1 ticket, so provide clear, detailed information to help them make educated purchase decisions and prevent issues down the road (like refunds or negative reviews… yikes!)
ACTIVITY/EVENT—Is there a minimum age for your experience?
Depending on your Experience, you may have obvious age restrictions like 21+ or 18 and older.
In other cases, you may set a minimum age in order to create a certain ambience or atmosphere for your Experience, especially if it is best suited for adults, or vice versa, its best suited for children.
Whether or not a minimum age applies, keep in mind that you are responsible for understanding and complying with all laws, rules, regulations and contracts with third parties that apply to your Partner Offerings.
Learn more about our terms and conditions.
ACTIVITY/EVENT—What accessibility features do you offer?
The aim is to provide a smooth, memorable experience for everyone.
That’s why it’s important to consider those who have special needs.
Wherever possible, provide accessibility features in your Experience to better accommodate people living with disabilities.
By prioritizing inclusion and respect, your Experience will stand out in a really cool way since there are HUGE gaps in our industry when it comes to accommodating individuals with special needs.
ACTIVITY/EVENT—What activity level should people expect?
This is your chance to set expectations for what sort of activities participants must be comfortable with: light, moderate, strenuous, extreme.
When your Activity or Event requires strenuous or extreme activities, it is strongly encouraged that the Seeker has prior experience or related training. This information must be clearly communicated in your Description and Who can attend this experience? sections.
ACTIVITY/EVENT—What skill level is required?
This is your chance to set expectations for the level of knowledge or experience participants must have prior to booking: beginner, intermediate, advanced, expert.
When your Activity or Event requires advanced or expert mastery, it is strongly encouraged to clearly communicate this information in your Description and Who can attend this experience? sections.
ACTIVITY/EVENT—What will you provide for Seekers?
You can provide anything to make your Experience special, such as complimentary food & drinks or special equipment to differentiate your Experience from others.
The idea here is be thoughtful.
Provide anything that makes your Experience easier to try by removing unnecessary friction.
For instance, if your unique Experience requires uncommon supplies or tools, it’s best that you supply them rather than requiring Seekers to purchase these items in order to participate in your cool Experience.
PRO TIP: Most people are looking for all-inclusive options!
EXAMPLES OF PROVISIONS
- Telescope
- Vision Board Kit
- 2 meals per day (Breakfast & Dinner)
- Yoga Mat
- Snacks
- Snowshoes
- Kayak & Paddles
- Lifejacket
- Flashlight
- Ukulele
ACTIVITY/EVENT—What should Seekers bring?
If Seekers need to bring anything in order to enjoy your Experience, this is the place to tell them.
Add each item on a separate line, such as individual art supplies or tools needed.
For cooking classes, you must list each ingredient on a separate line.
This will serve as your complete ingredient list for Seekers, so they can come prepared and ready to cook up something AWESOME in the kitchen (or over the fire, on a hot stone, or in a solar cooker, if your super creative!)
EXAMPLES OF
- Sunscreen
- Binoculars
- Yoga Mat
- Warm Jacket
- Hiking Boots
- Pen or Pencil
- Notebook
- Sunglasses
- Drinking Water
- Cash for Drinks
ACTIVITY/EVENT—Additional Instructions (Optional)
This section allows you to provide information exclusively to individuals who have booked your Experience. Include any information here that you want sent in the confirmation email to Seekers. Try to leave enough room to sign-off your message to make it feel more personal, such as:
“See you soon!” or “Excited to meet you!”
If there is nothing additional you need to communicate in order to make sure everything goes smoothly, this is a great opportunity for another touchpoint with your new customer.
You can use this real-estate to say thank you or express your gratitude, or let them know how excited you are to learn more about them soon.
It’s up to you, of course, you can always leave it blank. But why would you do that when you could make your confirmation email more personal instead?
IN-PERSON ACTIVITY/EVENT ONLY—Where will Seekers meet you? (Where will your event take place?)
If you’re offering an in-person Activity or Event, you’ll need to define the address of where your Experience will take place.
If your Experience moves to different locations throughout, then this address is where Seekers will meet you.
ACTIVITY/EVENT/PRODUCT—How much do you charge?
In the pricing section, you define the price you require each Seeker to pay. It’s important to set a realistic & competitive price.
Consumers are smart and we do our research, so you should do your research to determine where to set your pricing.
QUICK REVIEW OF KEY PRICING TERMS TO KNOW:
- Unlimited—No limit on the ticket option up to the maximum quantity allowed
- Private Group—Once the Instance is booked, no additional bookings are accepted for that reserved date & time
- Bundle—The quantity set is the # of tickets included in the booking
For Products, this price is what you charge before shipping & handling; however, if you’re offering FREE SHIPPING, you may want to incorporate your shipping costs into your pricing. We recommend going this route if your shipping costs are low, because people expect (thanks, Amazon) and LOVE free shipping options ❤️ That said, if your shipping costs are high, it might be best to charge separately for shipping & handling.
ℹ️ Learn more about how to set up your Product pricing options!
For Activities and Events, you can offer group pricing by creating ticket bundles to sell more tickets at one time.
ℹ️ Learn more about how to set up your Event pricing options!

For Activities, you can also offer private group pricing to sell exclusive group tickets. All this flexibility means you can give the people what they want, get more bookings in return, manage your resources, and offer discounts!
ℹ️ Learn more about how to set up your Activity pricing options!
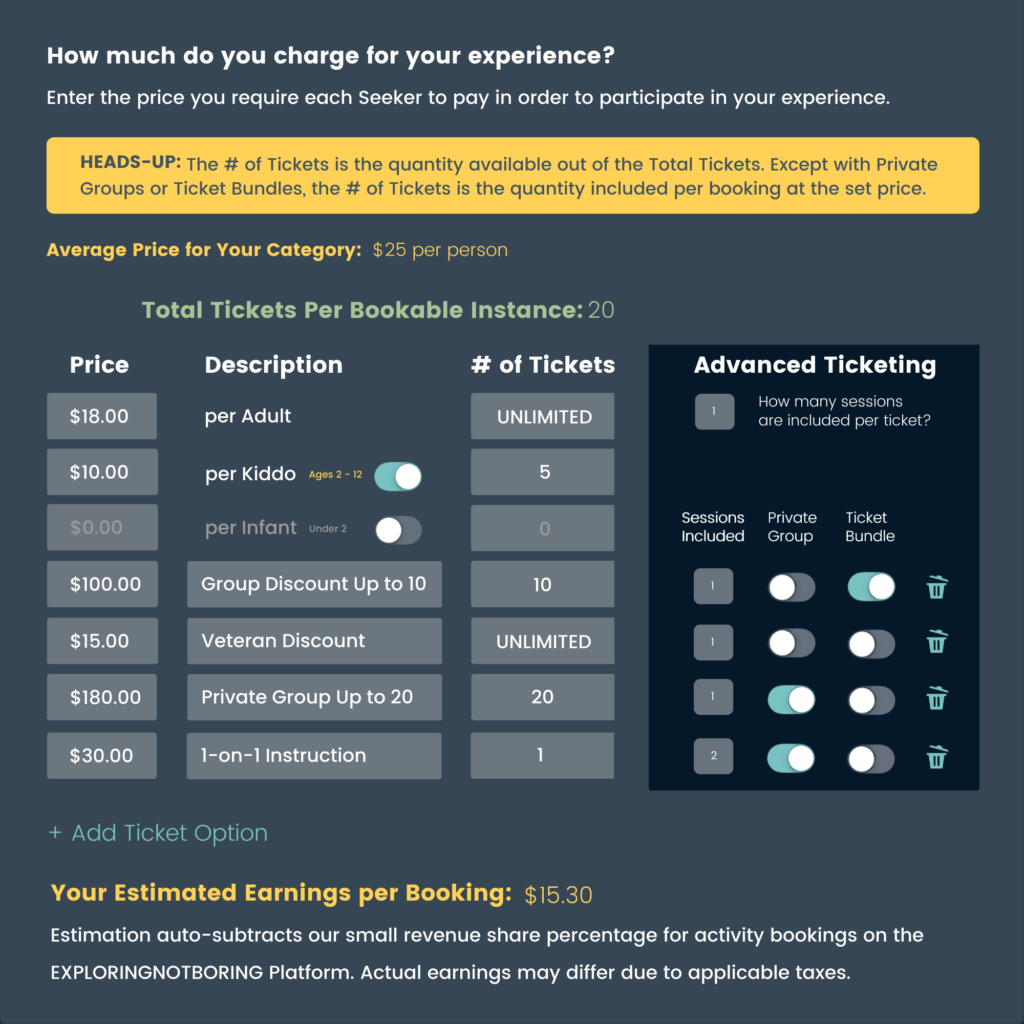
DEFINITIONS
- UNLIMITED—There is no defined quantity. Bookings will be accepted up to the max quantity allowed based on the availability of other Pricing Options.
- # of Tickets—The number you set here will determine how many of this type of ticket you have available out of the total number of tickets available.
If you set a number, that specific ticket tier (e.g. Kiddo tickets) will be restricted to that quantity. If you leave the # of Tickets at the default setting of “UNLIMITED,” then up to the total number of tickets available could be purchased. “UNLIMITED” is perfect when it doesn’t matter how many of that type of ticket is sold.
Restricting a specific ticket tier is important when you only have so much capacity or when you want to offer group tickets or private groups.
When using the Private Group or Ticket Bundle toggles, the # of Tickets defines the quantity of tickets included for that purchase price.
For Example: If you have 20 tickets and you set the # of Tickets as UNLIMITED for Adults, and 5 for Kids, then up to 20 Adult tickets can be purchased, but only 5 kid tickets can be bought.
- Ticket Bundles—This toggle groups the # of tickets together. When booked, all tickets will be purchased at once and the buyer will have the opportunity to define the names of each attendee.
- Private Groups—This toggle groups the # of tickets together and limits the instance to a single booking. When booked, all tickets will be purchased at once and the buyer will have the opportunity to define individual attendees. No other bookings will be available for the instance reserved (date & time).
EVENTS ONLY—Ticket / Admission / Registration Information
This section allows you to let Seekers know what is included with their ticket and provide any other applicable information such as seat locations or details you’d like them to add to the “notes” section during checkout.
If your event is FREE and open to the public, make that clear by writing “FREE ADMISSION” in this box.
PRODUCTS ONLY—Learn More
Everyone loves a good story! It’s the human in us. Take the time to add the story behind your product. Where was it made? Why was it made? Is it environmentally friendly? What do you hope others get from it? This section is less about the product and more about its origin story.
PRODUCTS ONLY—Variations
Add available options like color or size.
PRODUCTS ONLY—Personalizations
Do you offer engraving, signed copies, tailoring, or other customizations?
This is the spot to provide instructions to collect the personalized information you need in order to customize the product.
The instructions you provide here will become the placeholder text in the field where the buyer enters their personalization details.
PRODUCTS ONLY—Shipping
It’s important that you set clear & realistic shipping expectations by providing accurate information in this section.
We recommend providing FREE SHIPPING since it’s a popular option that increases sales by serving as a great incentive for buyers.
Of course, it’s completely up to you and we acknowledge that there are plenty of cases where free shipping isn’t the best option.
Typically when the shipping cost is high, free shipping isn’t realistic since the shipping cost must be incorporated into the total price, and inflating the total price may reduce your competitiveness on the internet.
When your shipping cost is low, it’s a great opportunity to provide FREE SHIPPING to appeal to the expectations and desires of online shoppers!
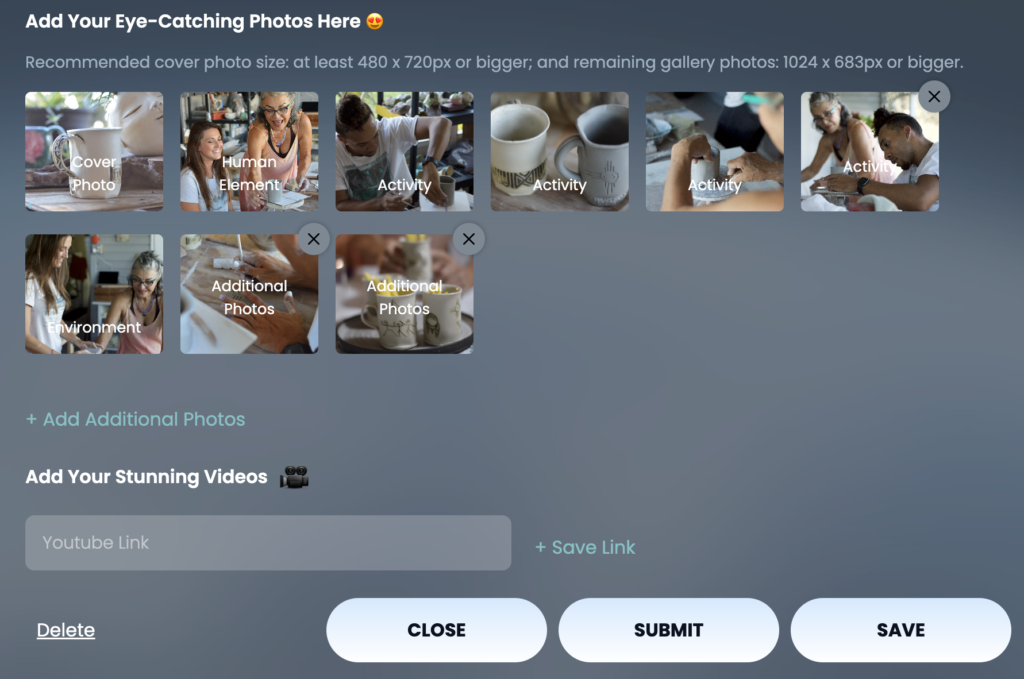
STEP 6: UPLOAD YOUR PHOTOS & VIDEOS
BOOM!! You’re now on the last step before you submit your Listing:
Upload a minimum of 3 high-quality photos & videos.
7 pieces of media tell the best story, but we require at least 3 photos or videos to submit your listing. Why? Visuals drive higher engagement and conversion rates by painting a clear, trustworthy, and emotional picture. The brain processes images up to 60,000 times faster than text, so high-quality, authentic visuals immediately communicate the value and atmosphere of the experience, helping people envision themselves in the experience.
Think about it, don’t you want to know exactly what you’re exchanging your hard-earned money for when you shop online? And isn’t it an easier decision to buy when you know exactly what to expect, who you’re giving your money to, and that you’ll get quality, value, and an exceptional customer experience in return?
In the world of increasing sales by making your offer available to buy online, anywhere, anytime, there are mainly 2 ways people judge before they buy:
- We read online reviews to gain insight & personal recommendations; and
- We judge the book by its cover!
Since we can’t feel it, taste it, smell it before we buy it, we seek pictures of it and envision what it’s like in reality.
That’s why it’s important you aim for 7 pieces of visual evidence to give the complete picture and tell a compelling story.
Coupled with a complete and compelling description, your Listing will inspire action by giving Seekers a sense of what it’s like to participate in your experience or use your product.
Keep this in mind, your photos (especially your cover photo) create the first impression, so be very intentional about how you showcase your offering.
HEADS-UP: Our team will review each photo to ensure it meets our quality standards below. These requirements are put in place to gently nudge you into better marketing practices. Give the people what they want and they will come.
Requirements for All Photos
- Photos must be bright, clear, and in color
- Photos must accurately describe the activity, event or product
- Photos must belong to you—you cannot use copyrighted materials you don’t own
- Photos cannot show people posed for the camera or taking a selfie
- Photos cannot be edited with filters, text or graphics, logos, or collages
- Events ONLY—Your event flyer can include text, graphics, and your logo
- Products Only—Your details photo can include text, graphics, and your logo
Photo Tips
- Choose an authentic or candid cover photo that represents the activity, event or product as a whole. Selfies will not be accepted.


- Pick photos that show how your activity, event or product is different from others.
- Include a human element, such as showcasing Seekers having fun & engaging with each other, highlighting yourself connecting with Seekers, or showcasing the product being held or used.
Psst . . . try a “practice run” of your experience with friends or family to capture
candid shots of yourself interacting with others enjoying your experience.
- Focus on the activity or benefits, such as highlighting what Seekers will do or make, or how Seekers can use your product to elevate their life experiences.
- Don’t add dark images, filters or blurry photos 🤮
Extra Tips for Product Photos
- Use natural light and no flash.
- Include a common object for scale.
- Take photos from every angle.
- Shoot against a clean, simple background.
STEP 7: SUBMIT YOUR LISTING
Submissions require all details not marked as OPTIONAL to be entered and you must upload your 7 pieces of visual evidence (i.e. photos and/or videos).
Once you submit your Listing, our approval team will review it to ensure it meets our Quality Standards and also look for opportunities to provide meaningful feedback. You will receive an email and a notification within your Partner Account when your Listing is out of review.
STEP 8: ADD YOUR AVAILABILITY
Product Listing? Skip to Step 9. If you’re offering an Activity or Event, upon approval, add your availability to open up your calendar for bookings.
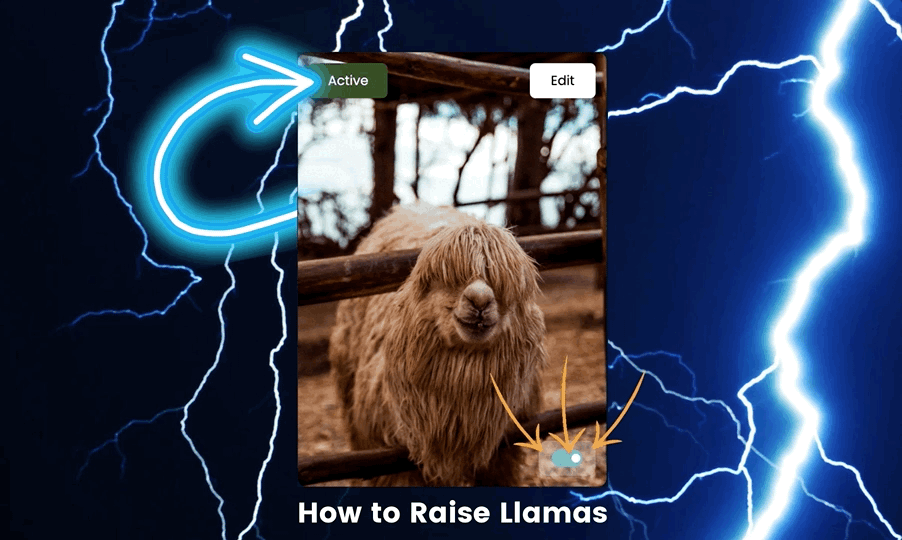
Just click EDIT on your Listing to jump to the Bookings Settings page.
From there, you can add the date or day that you want to start, followed by the times you want to offer. Remember, every time slot is an instance of your offering. “Instance” is another way of saying session, class, or occurrence of your Activity or Event.
Instance /ˈinstəns/
noun
an example or single occurrence of something.
“I offer 5 instances of my experience per day”
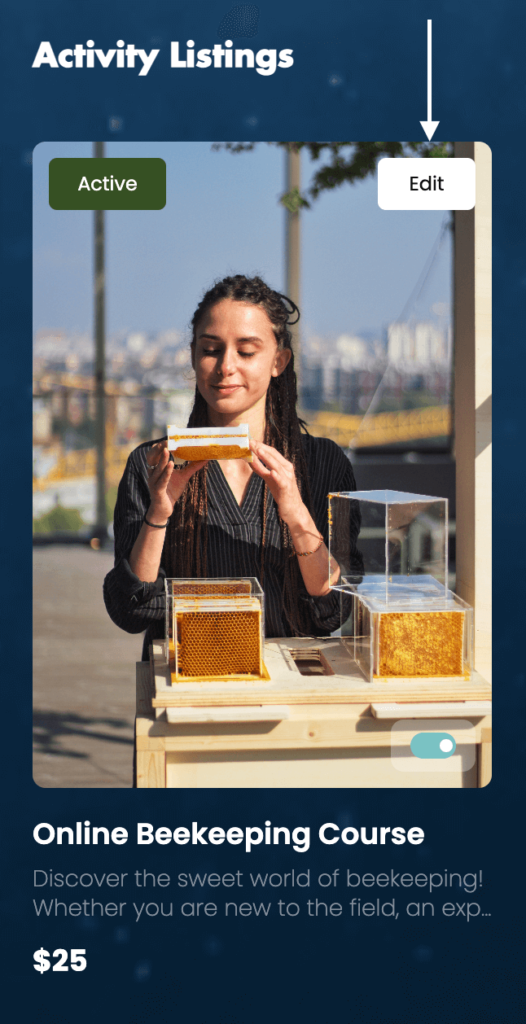
STEP 9: ACTIVATE YOUR LISTING
Now you’re ready to hit that cute little toggle on your new Listing to ACTIVATE it. That’s right!! Congratulations, your Listing is now LIVE on the platform 🎉
That means it is open for discovery!
So, celebrate every win and share your success stories with the community.
STEP 10: SHARE THE LINK TO YOUR LISTING
Every Listing has a unique identifying URL that you can send to anyone interested in your unique Activity, Event, or Product.
There are many ways you can use your unique link.
How to Leverage Your Listing Link:
- Share it on social media (in your posts and bio)
- Use it as a landing page in your marketing campaigns
- Hyperlink to it from your website
- Send curious parties straight to the goods!
DID YOU KNOW . . . ?
You can use your Partner Dashboard as your website if you don’t have one.
It’s essentially a catalog of unique awesomeness and it has a unique identifying URL like your Listings.
So, if you don’t have a website already, now you do 😊
How to leverage your Partner Profile Link:
- Add it to your Instagram bio (Only have one Listing? Use your Listing URL)
- Use a link shortner to use it on prints (e.g. business cards, flyers)
- Create a QR code (use on print marketing)
BOOM! NOW YOUR LISTING IS OUT THERE 🎉
Now that your Listing is LIVE, it’s time to provide an exceptional customer experience to everyone who purchases from you.
It’s also important to keep your Listing up-to-date, and the super cool thing about that is—You have full control on exploringnotboring.com!
You set your rules, price, availability, and can edit your Listing at any time. That means it’s super easy to update your photos whenever you need.
Just make sure any edits you make uphold our Quality Standards to prevent your Listing and account from being permanently removed from the Platform.
Need more help?
Try these steps:

Search the Help Hub
Find the answers you need!

Contact Us
We’ll help you get there!
The information in this article is for informational purposes only, you should not construe any such information or other material as legal, tax, investment, financial, or other advice. If you need legal advice, you should consult a licensed attorney in your area.


0 Comments